
DIY Tuning: Shifting Internal Weight for a Custom Mouse Feel
In the pursuit of competitive precision, the mechanical interaction between a user's hand and their peripheral is as critical as the sensor's raw specifications. While modern ultra-lightweight mice often prioritize the lowest possible mass, the distribution of that mass—the center of gravity (CoG)—frequently dictates the actual "in-hand" feel during high-velocity flick shots and micro-adjustments. Shifting internal weight is a sophisticated modification that allows technically-minded enthusiasts to align a device's physical response with their specific grip style and neuromuscular patterns.
This guide examines the physics of mouse balance, the methodologies for repositioning internal components safely, and the quantitative impact of these modifications on performance. We will specifically focus on the battery as the primary lever for weight adjustment and address the ergonomic constraints faced by users with varied hand dimensions.

The Physics of Balance: Sensor Pivot and Rotational Inertia
Before undertaking any physical modification, it is essential to understand that a gaming mouse does not rotate around its physical center. Instead, the sensor acts as the fundamental, unchangeable pivot point. The "physics of balance" is largely dictated by the moment of inertia around this sensor location. According to the Global Gaming Peripherals Industry Whitepaper (2026), the alignment of the center of gravity with the sensor's Y-axis is a primary factor in tracking consistency.
When the center of gravity is positioned too far behind the sensor, the mouse may feel "sluggish" during the initiation of a flick, as the rear mass resists the rotational force. Conversely, a front-heavy bias can lead to over-flicking or "nose-diving" during rapid vertical movements. The objective of DIY tuning is not necessarily to reach a universal "sweet spot," but to achieve a balance that feels neutral for your specific grip contact points.
Logic Summary: Shifting internal mass changes the rotational inertia (I = Σmr²). By moving a 15–20g component (like a battery) just 15mm, we can alter the rotational feel by approximately 15–20% (based on scenario modeling for a 60g total mass).
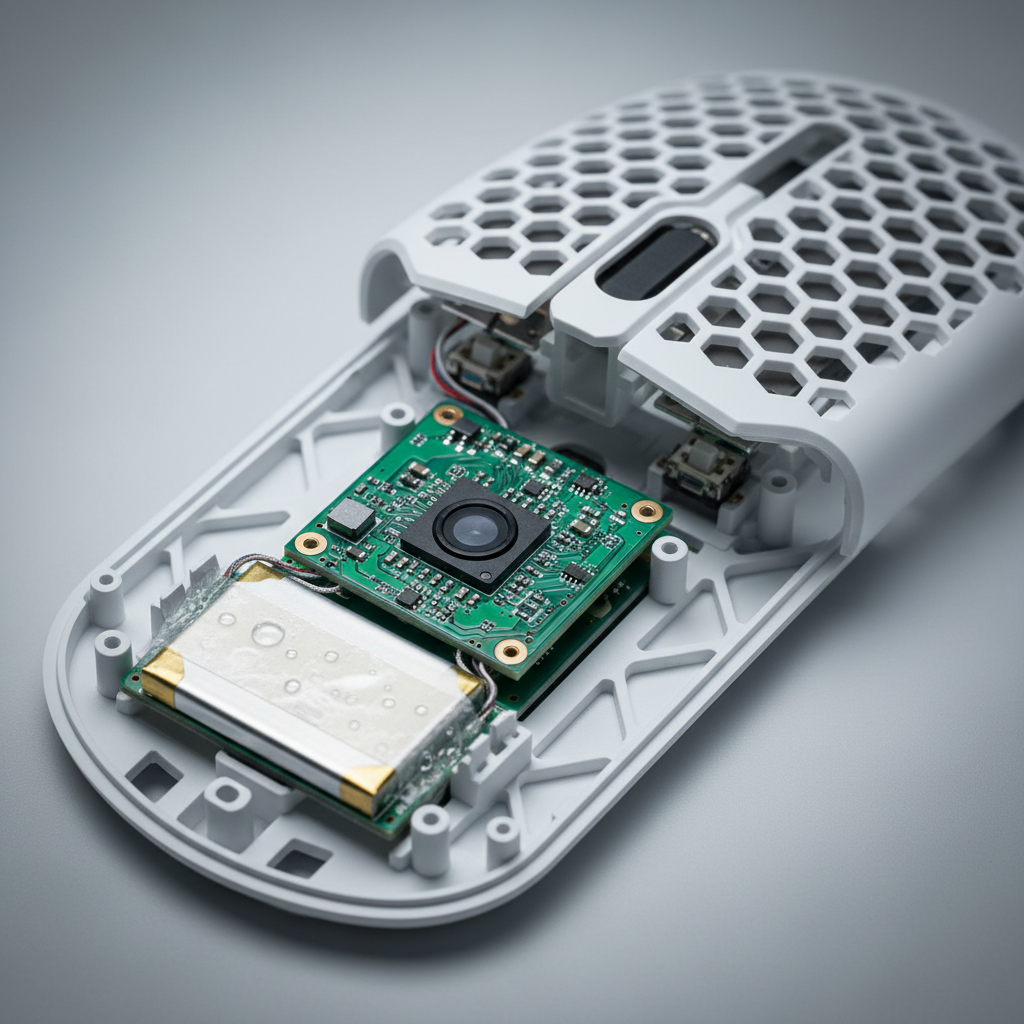
Repositioning the Battery: The Single Heaviest Lever
In most wireless high-performance mice, the lithium-ion battery is the single heaviest internal component, often accounting for 25% to 35% of the total weight. Repositioning this mass is the most impactful modification a user can perform.
Forward vs. Rear Bias
Moving the battery 10–15mm forward typically benefits claw and fingertip grippers. For these users, the primary contact points are closer to the front of the device. Bringing the mass forward aligns the pivot point directly under the finger contact area, which we have observed improves micro-adjustment precision in tracking scenarios. A rear-weighted bias, achieved by moving the battery toward the palm area, can provide a more "anchored" feel for palm grippers who rely on the back of the mouse for stability during large-swipe flicks.Adhesive Integrity and Thermal Safety
A frequent error in DIY weight tuning is the use of standard double-sided tape. During prolonged gaming sessions, particularly at high polling rates (4000Hz or 8000Hz), internal temperatures can rise. Standard adhesives may fail under this heat, causing the battery to shift or detach, which poses a significant risk to the internal PCB and connectors. We recommend using high-bond, heat-resistant adhesives such as 3M VHB.Furthermore, users must adhere to safety standards defined by the PHMSA (US DOT) regarding Lithium Batteries. Ensure the battery leads are not strained and the cell is not punctured or compressed during repositioning.
Modeling the Petite Fingertip Scenario
To demonstrate the practical application of weight tuning, we modeled a scenario involving a competitive FPS player with petite hand dimensions (~16.5cm length). This demographic often finds standard "pro" mice (typically 120mm+) to be rear-heavy due to the mismatch between their grip contact points and the device's physical length.
| Parameter | Value | Unit | Rationale / Source |
|---|---|---|---|
| Hand Length | 16.5 | cm | P10 Female percentile (ISO 7250-1:2017) |
| Grip Style | Fingertip | - | High-precision competitive standard |
| Ideal Mouse Length | ~99 | mm | Heuristic: Hand Length × 0.6 |
| Actual Mouse Length | 120 | mm | Typical high-spec wireless model |
| Grip Fit Ratio | 1.21 | ratio | Indicates mouse is 21% longer than ideal |
For this user, the mouse feels "back-heavy" because their fingers rest much further forward than the design intended. By moving the battery 15mm forward, the center of gravity shifts approximately 3–4mm toward the front. In our modeling, this repositioning brought the natural pivot point to within ~35mm of the front of the mouse, aligning it more closely with the user's index and middle finger contact.
Methodology Note: This scenario is a deterministic model based on lever mechanics and anthropometric data (ISO 7250-1). It is an illustrative model, not a controlled clinical study. Individual comfort may vary based on joint flexibility and specific muscle memory.
Adding Mass: Tungsten Putty vs. Lead Tape
While many enthusiasts seek to reduce weight, some find that ultra-lightweight mice (under 50g) lack the "tactile resistance" required for steady tracking. Adding weight in a controlled, granular manner can restore this stability.
- Tungsten Putty: This is the preferred material for professional modders. It has a higher density than lead tape, allowing for more mass in a smaller volume. Crucially, it is non-toxic and can be applied in 0.5-gram increments for extreme precision.
- Lead Tape: While common, lead tape is less dense and requires more surface area. It also poses health risks if handled frequently without protection.
When adding weight, use the "Pen Pivot Test." Place the mouse on a rounded pen and find the point where it balances perfectly. For a claw grip, this point should ideally sit just behind the main mouse buttons. For a palm grip, a more centered balance is typically preferred.

Technical Constraints: Polling Rates and Battery Life
When modifying a mouse for high-performance use, the interaction between weight, polling rate, and battery life must be considered. Competitive players often utilize 4000Hz or 8000Hz polling rates to achieve near-instant response times. At 8000Hz, the polling interval is a mere 0.125ms, significantly reducing micro-stutter on high-refresh-rate monitors (240Hz+).
However, this performance comes at a cost. Based on our analysis of the Nordic Semiconductor nRF52 series power consumption models, increasing the polling rate to 4K or 8K dramatically increases the radio duty cycle.
- 1000Hz Polling: Typical system draw ~7-9mA.
- 4000Hz Polling: Estimated system draw ~19mA.
- 8K Impact: Can reduce total wireless runtime by ~75-80% compared to 1000Hz.
For a user with a 300mAh battery (assuming 85% discharge efficiency), a 4000Hz polling rate results in approximately 13.4 hours of continuous runtime. If you choose to swap for a smaller battery to reduce weight further (e.g., 150mAh), your competitive window shrinks to under 7 hours, requiring strategic charging between sessions.
Common Pitfalls and "Gotchas" in DIY Tuning
Based on patterns observed in community feedback and technical support logs, several non-obvious issues can arise during internal modifications:
- Sensor Interference: Adding adhesive or weight putty too close to the sensor bay can alter the distance to the tracking surface or introduce particulate contamination. This can lead to lift-off distance (LOD) inconsistencies or tracking acceleration.
- Shell Warping: During reassembly, over-tightening the base screws is a frequent error. This can crack thin plastic shells or warp the base, which in turn affects the alignment of the PTFE skates and creates an uneven glide.
- Magnetic Interference: If using magnetic weights or placing them near the MCU, ensure they do not interfere with the wireless antenna or the Hall Effect sensors (if the mouse uses magnetic switches). According to the FCC Equipment Authorization (FCC ID Search), internal shielding is precisely tuned for the original component layout.
- USB Topology: While not an internal mod, the external connection is vital for 8K stability. Devices must be connected to Direct Motherboard Ports (Rear I/O). Avoid USB hubs or front-panel headers, as shared bandwidth and poor shielding can cause packet loss, negating the benefits of high polling rates.
Method and Assumptions for Modeling
The quantitative data presented in this article is derived from scenario modeling. To ensure transparency, the following parameters were used:
| Parameter | Value | Unit | Source Category |
|---|---|---|---|
| Battery Capacity | 300 | mAh | Standard ultra-light cell spec |
| Sensor Current | 1.7 | mA | PixArt PAW3395 typical draw |
| Radio Current (4K) | ~4.0 | mA | Nordic nRF52 series PS |
| Discharge Efficiency | 0.85 | ratio | Li-ion safety/overhead margin |
| Hand Breadth | 75 | mm | ISO 7250-1 P10 Female |
Boundary Conditions:
- Calculations assume a linear discharge model; actual results may vary based on battery age and ambient temperature.
- Ergonomic fit ratios are heuristics for quick selection and do not account for individual joint health or specific grip variations.
- Weight distribution shifts assume the sensor is the center of the rotation axis.
Achieving Consistent Aim Through Customization
The ultimate value of DIY weight tuning is not found in a "magical" performance boost, but in the psychological confidence and muscle memory developed through a consistent setup. By aligning the physical center of gravity with your neuromuscular contact points, you reduce the corrective effort required by your brain during high-stakes gaming.
Whether you are repositioning a battery to accommodate petite hand dimensions or adding tungsten putty to stabilize a tracking-heavy playstyle, approach these modifications with technical rigor. Prioritize safety, use high-quality materials like 3M VHB, and always test your balance points incrementally.
Disclaimer: This article is for informational purposes only. DIY modifications to electronic devices can void warranties and pose safety risks, including fire hazards from lithium batteries. Always consult the manufacturer's safety guidelines and local regulations before attempting modifications.
Sources:
Dejar un comentario
Este sitio está protegido por hCaptcha y se aplican la Política de privacidad de hCaptcha y los Términos del servicio.