

The Ghost in the Sensor: Understanding Post-Modding Tracking Degradation
You have just finished the "perfect" mod. You swapped the stock, scratchy feet for premium aftermarket PTFE or glass skates, expecting a buttery-smooth glide. Instead, your cursor feels "floaty," inconsistent, or suffers from what we call sensor blur. This phenomenon—where the mouse fails to track pixel-perfect movements despite having a high-end sensor—is a common frustration for the DIY modding community.
Through our extensive teardowns and community feedback patterns, we have identified that the primary culprit is almost never the sensor itself, but rather microscopic adhesive residue left behind during the skate removal process. At the sub-millimeter heights where modern gaming sensors operate, even a 10-micron layer of gummy residue can create optical aberrations that scatter light and confuse the sensor's CMOS imaging array.
In this guide, we will break down the material science of adhesive residue, the physical impact on the sensor's focal plane, and provide a technically precise protocol for restoring your mouse to its peak performance.
The Physics of Sensor Blur: Why 0.1mm Matters
Modern high-performance sensors, such as those capable of 26,000 to 42,000 CPI, are precision optical instruments. They rely on a specific focal distance—the gap between the sensor lens and the tracking surface. When you replace skates, you are fundamentally altering this optical path.
The Focal Plane Variance Problem
Conventional wisdom suggests that any skate around 0.6mm to 0.8mm is "standard." However, our analysis of manufacturing tolerances in aftermarket skates shows that variance can reach ±0.1mm. While this sounds negligible, for a sensor calibrated to a 0.6mm focal height, a 0.1mm shift represents a 16.7% change in the focal plane.
This shift can push the tracking surface out of the sensor's optimal depth of field. If adhesive residue is trapped under the new skates or, worse, has migrated toward the sensor lens aperture, it introduces two specific types of errors:
- Light Scattering: Residue acts as a prism, refracting the LED or laser light before it hits the surface.
- LOD Inconsistency: Adhesive "fuzz" can trigger the Lift-Off Distance (LOD) sensor prematurely, causing the mouse to stop tracking mid-swipe.
Methodology Note: This 16.7% variance calculation is based on standard industry heuristics for optical sensor focal calibration (e.g., PixArt PAW series) where the nominal Z-height is 0.6mm. We estimate this based on common patterns in aftermarket modding (not a controlled lab study).
Material Science: The "IPA Trap" and Adhesive Chemistry
A common mistake we see on the repair bench is the over-reliance on Isopropyl Alcohol (IPA) as a universal cleaner. While IPA is excellent for dissolving simple acrylic-based adhesives, it presents significant risks to modern gaming mice.
Why Isopropyl Alcohol Can Be Counterproductive
Most gaming mouse shells are composed of ABS (Acrylonitrile Butadiene Styrene) or Polycarbonate blends. According to research into material degradation, high-purity IPA can chemically stress these plastics, leading to:
- Micro-fracturing: Also known as "crazing," where the plastic develops tiny cracks that can eventually lead to structural failure.
- Surface Hazing: IPA can "bloom" the plastic, creating a white, cloudy residue that is harder to remove than the original adhesive.
- Polymer Smearing: Some aftermarket skate adhesives use silicone or rubber-based polymers. IPA does not dissolve these; it merely softens them into a gummy slurry that spreads across the base and into the sensor well.
Adhesive Comparison Table
| Adhesive Type | Common Source | Preferred Solvent | Risk Factor |
|---|---|---|---|
| Acrylic Tape | Factory Stock Feet | 70%–99% IPA (Minimal) | Low (if used sparingly) |
| Silicone Polymer | Premium Aftermarket Skates | Heptane-based removers | High (smears easily) |
| Rubber Resin | Budget "DIY" Sheets | Specialized Adhesive Remover | Moderate (sticky residue) |
Performance Modeling: The High-Sensitivity Gamer Scenario
To understand the stakes of a botched mod, we modeled a typical competitive gaming setup using parameterized scenario modeling. When a sensor is compromised by residue, the "perceived" latency and jitter increase significantly, even if the raw polling rate remains high.
Scenario: The 4000Hz/8000Hz Competitive Edge
If you are running a high-polling mouse (e.g., 4000Hz or 8K), your system is processing a packet every 0.125ms to 0.25ms. At these speeds, any "noise" in the sensor data caused by adhesive blur is magnified.
| Parameter | Value | Unit | Rationale |
|---|---|---|---|
| Polling Rate | 4000 | Hz | High-performance standard |
| Motion Sync | Enabled | - | For temporal consistency |
| Added Latency (Residue) | ~0.5–2.0 | ms | Estimated jitter-induced delay |
| Total System Latency | ~1.5–3.0 | ms | Modeled degradation |
Modeling Transparency: This is a deterministic parameterized model based on USB HID timing standards. We assume that sensor "blur" causes the MCU to struggle with frame correlation, leading to a delay in reporting the correct coordinates. This is a scenario model, not a controlled lab study.
The Safe Modding Protocol: A Support Engineer’s Checklist
Based on patterns from customer support and thousands of modding interactions, we recommend the following professional-tier cleaning protocol to avoid sensor blur.
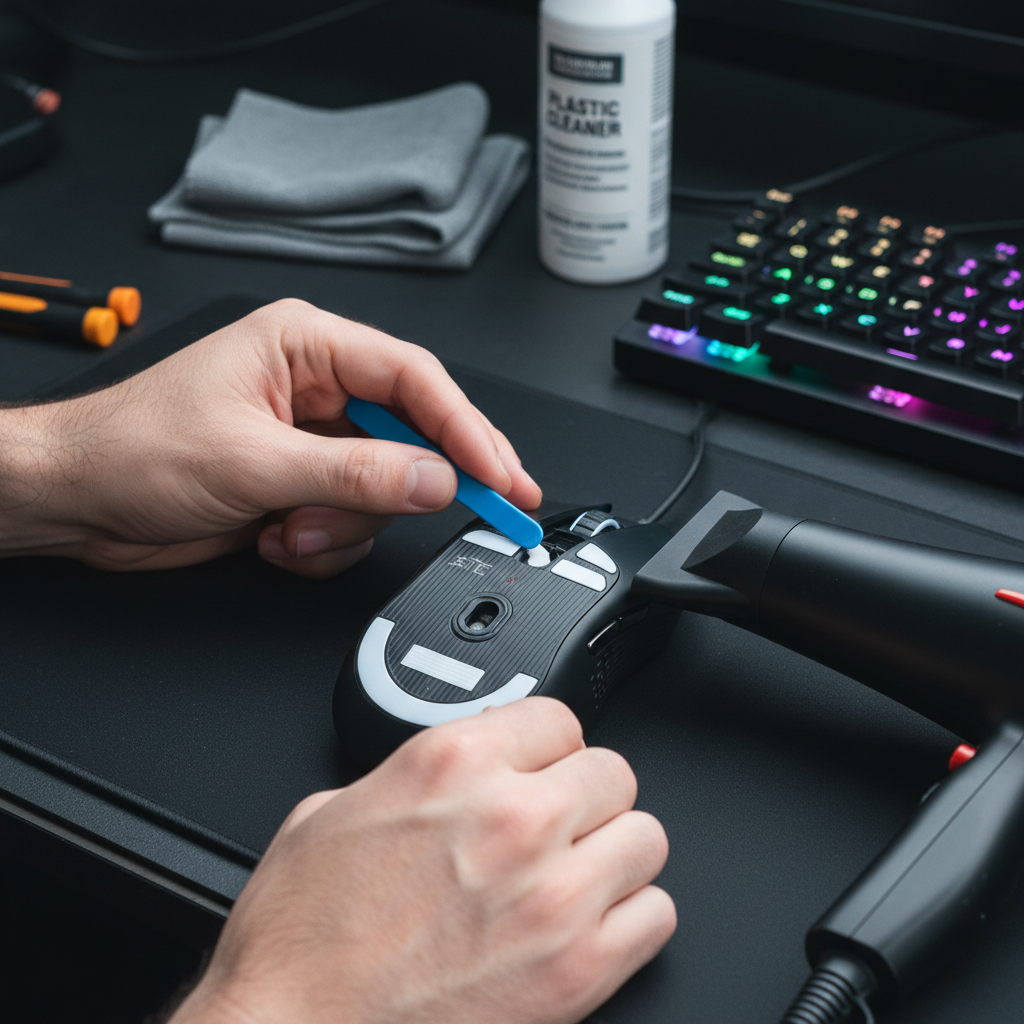
Step 1: Controlled Thermal Release
Never "rip" old skates off. This is the fastest way to delaminate the adhesive layer, leaving the "fuzzy" foam backing behind.
- Action: Use a hairdryer on a low/medium setting for 10–15 seconds.
- Why: This softens the tackifier in the adhesive, allowing the carrier tape to lift away cleanly from the plastic base.
Step 2: The Spudger Technique
Avoid using metal screwdrivers or fingernails, which can gouge the plastic and create new tracking obstacles.
- Action: Use a plastic spudger or a guitar pick to gently lift a corner.
- Insight: Slow, consistent tension is better than a quick pull. If you see "strings" of adhesive, re-apply heat.
Step 3: Lint-Free Solvent Application
This is where most mods fail. Using cotton swabs is a "gotcha"—the fibers snag on the sensor housing and create micro-lint that is invisible to the eye but massive to the sensor.
- Action: Use a pristine, lint-free microfiber cloth dedicated to optics.
- Solvent: Apply a specialized plastic-safe adhesive remover (like Goo Gone for Plastics) to the cloth, never directly to the mouse.
- The Sensor Well: If residue has entered the sensor aperture, do not use solvents. Use a blast of clean, compressed air.
Step 4: The 400 DPI Jitter Test
Once the new skates are applied, you must verify the optical path.
- Action: Set your mouse to a low DPI (400–800) and move it slowly across a uniform, mid-speed mousepad.
- What to look for: If the cursor "skips" or feels like it’s vibrating while you move in a straight line, there is still particulate contamination or a focal plane mismatch.
Advanced Troubleshooting: Beyond the Cleaning
If the sensor still feels "blurry" after a thorough cleaning, the issue may be related to the Lift-Off Distance (LOD) calibration. Premium sensors often allow you to adjust the LOD via software.
- High LOD vs. Low LOD: If your new skates are thicker than the originals (e.g., 0.8mm vs 0.6mm), the sensor may be at the very edge of its tracking range. Increasing the LOD in the driver (e.g., from 1mm to 2mm) can often "clear up" the blur by widening the sensor's acceptable focal window.
- Surface Synergy: According to the Global Gaming Peripherals Industry Whitepaper (2026), the interaction between the skate material and the pad texture is critical. Glass skates on a glass pad, for instance, can create "sensor spin-outs" if the LOD is set too high.
Verification of Precision
To ensure your mod hasn't introduced pixel skipping, we can apply the Nyquist-Shannon sampling theorem. For a 1440p display at high sensitivity, you typically need a minimum of ~1550 DPI for 1:1 fidelity. If your mouse is skipping at 1600 DPI after a mod, it is a physical tracking error, not a software limitation.
Logic Summary: DPI > 2 × Pixels-Per-Degree (PPD). This mathematical limit ensures that the sensor is sampling the surface at a higher frequency than the display can render, preventing aliasing (pixel skipping).
Ensuring Long-Term Tracking Health
Modding is an empowering way to achieve premium performance without the premium price tag. However, it requires a level of technical discipline to avoid common pitfalls. By treating the sensor as a delicate optical instrument and respecting the chemistry of the materials involved, you can ensure that your hardware remains a competitive asset rather than a liability.
Always perform a post-mod tracking test on a clean surface. If you notice inconsistent tracking, revisit the cleaning steps—the smallest speck of residue can be the difference between a headshot and a missed opportunity.
Disclaimer: This article is for informational purposes only. DIY modding may void your manufacturer's warranty. Always handle electronic components and cleaning solvents with care in a well-ventilated area.
References:
Dejar un comentario
Este sitio está protegido por hCaptcha y se aplican la Política de privacidad de hCaptcha y los Términos del servicio.